More by Krzysztof Greczka:
| Author: Krzysztof Greczka
Avg. reading time: 2 minutes
A lot of Nobl9 tooling has been inspired by Kubernetes. From `sloctl` (taken from `kubectl`) to our YAML format, we strive to be consistent with the Kubernetes spec to make it easier for newcomers to get started with Nobl9’s command-line tools.
With that in mind, we are happy to announce our new Helm Chart package, available on GitHub.
Setting Up Your Chart
There are just a few actions required to set up the chart:
- Install Helm and set up a connection to the desired Kubernetes cluster.
- Add the Nobl9 repo:
helm repo add nobl9 https://nobl9.github.io/helm-charts
Now you can discover the available charts:

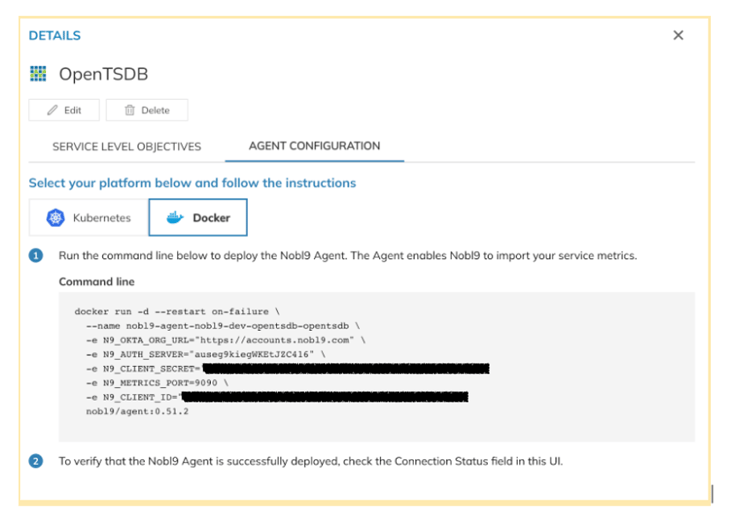
- Get the agent variables from the Nobl9 agent configuration page.
You can get to this page by navigating to Integrations -> Sources, choosing the data source, and selecting Agent Configuration. If you don’t see any data source agents on the Sources tab, you can create one by following the instructions in the Nobl9 documentation. The agent configuration page appears immediately after you add a new data source to Nobl9 via the UI when you select the Agent connection option.

- Prepare the chart values.
Review the default configuration in the documentation and the default values (values.yaml). You can extend this file as needed. For example, if we wanted to add OpenTSDB, we would create a new file named `values.yml` and add:
Where `clientId` and `clientSecret` map to `N9_CLIENT_ID` and `N9_CLIENT_SECRET` respectively, from the Agent Configuration.
Note that this data source requires an additional `N9_METRICS_PORT` variable to be provided. The `N9_OKTA_ORG_URL` and `N9_AUTH_SERVER` variables can be omitted because these values are equal to the defaults. - Deploy the chart:
helm install --values values.yml --generate-name nobl9/nobl9-agent
The expected output looks like this:
What Else Can You Do with a Helm Chart?
Here are some ways you can customize your Helm chart:
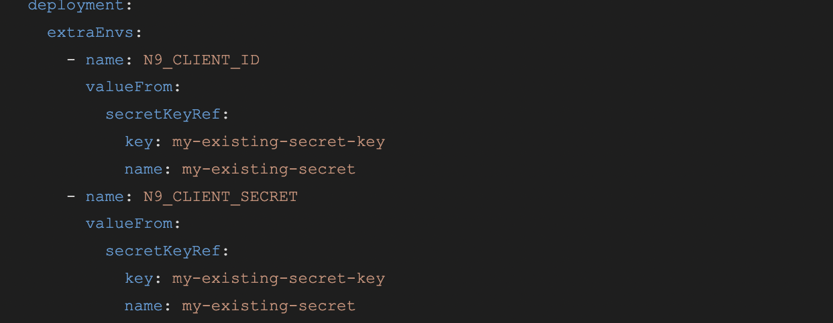
- Use existing Kubernetes Secrets.
If you have an existing Kubernetes Secret – for example, one synced with AWS Secrets Manager – you can adjust the chart to use that instead of creating a new one.
Instead of providing secrets inline:
you’ll need to use `extraEnvs`:
- Override the namespace or Secret name.
By default charts are installed in the default namespace, and the Secret name is equal to the chart name. You can change that behavior using overrides:
- Add extra data to a secret.
Some data sources, like Splunk, require additional variables (tokens, passwords, etc.). To securely store them, you should use Kubernetes Secrets. In the Helm chart, you can define the variables you want to be included in the Secret and retrieved from it:
- Add extra labels and annotations.
You can set custom annotations and labels:
These will be appended to the existing lists of labels, annotations, and selectors. For example:
For more combinations, see values.yaml.
If you run into any problems or find a bug, you can open an issue on GitHub or contact our Support Team.
If you are not currently a Nobl9 customer, you can sign up for Nobl9 Free Edition at no cost.


.png)


.png?width=1200&height=628&name=Building%20Reliable%20E-commerce%20Experiences%20(42).png)
.png?width=1200&height=628&name=Building%20Reliable%20E-commerce%20Experiences%20(34).png)


Do you want to add something? Leave a comment